This post and the photos within it may contain Amazon or other affiliate links. If you purchase something through the link, I may receive a small commission at no extra charge to you.
Cricut Design Space is a familiar program for many crafters, and it’s a good place to begin if you’re just getting started with sublimation but are familiar with a Cricut. Here’s how to use Cricut Design Space for sublimation crafts, including how to get the best color!
Welcome back to my sublimation series! This is the first post in a series of deep dives into some of the different software programs you can use for your sublimation crafting. Since my blog has so many Cricut users, I thought I’d start with Cricut Design Space—in particular, using Cricut’s Print then Cut feature.
We’ll learn how to upload images to Cricut Design Space, how to modify images, and how to print them so that your color is as true as possible.
For more information about Cricut Print then Cut in general, check out my The Ultimate Guide to Cricut Print then Cut.
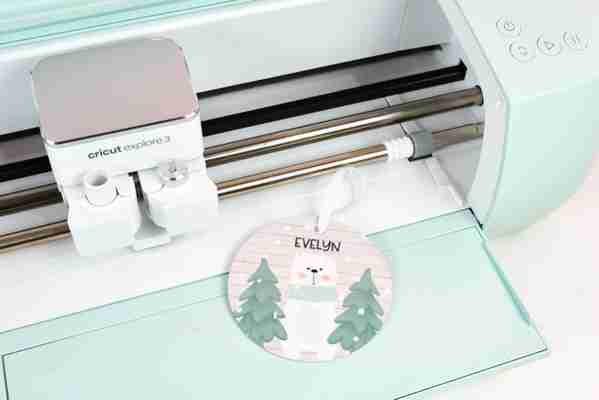
When I started on my sublimation journey, I really wanted the ability to use Cricut’s Print then Cut feature along with my sublimation prints. I hoped to combine the power and precision of my Cricut and the flexibility and range of color of my sublimation printer. For example, if you’re making round ornaments like in this post, it’s easy to cut out the circular sublimation transfer for putting on the ornament, vs. cutting a circle by hand.
Turns out, it’s totally possible to use Cricut Design Space for sublimation printing!
The easiest way to use Cricut Design Space for sublimation is to use the upload feature to upload sublimation PNG files. If you’re not a designer, this is probably going to be your best bet. While *technically* you could create complex sublimation designs in Cricut Design Space from scratch, using images and patterns, it’s not the most robust design software overall. So uploading designs from others (or designs you made yourself in another program) is a good place to start.
You can also use Print then Cut images from the Cricut Image Library, but I’ve found that occasionally the color can be a bit unpredictable with these images, strangely. It’s been very hit or miss for me.
Join our Sublimation Made Simple Facebook group for tips, tricks, support, and resources!
Print then Cut Limitations
The biggest limitation in using Cricut Design Space and Print then Cut is the size limit—6.75″ wide by 9.25″ tall. Therefore you’re limited to the size of the images you can print, and you can waste a lot of paper using this method. I would rather waste a bit of paper than cut a bunch of images by hand—you’ll have to decide if the tradeoff is worth it for you.
That being said, I’m working on a few ways to hack print then cut for larger images—stay tuned for that!
Creating a Sublimation Design in Cricut Design Space
For this post, I’m using this polar bear ornament design, which I got from (a great resource for sublimation files!). Click Upload in Cricut Design Space to upload the PNG. In the Select Image Type screen, choose Complex.
Uploading and Modifying a Sublimation Image in Design Space
Click continue. In the Background Remover screen, you’ll see that the image has a transparent background (represented with the checkered squares). Most PNGs should have this transparent background, but if not, you can click to remove the background. Click Apply & Continue.
In the Select Upload Type screen, choose Print then cut and click Upload.
Then select your image and bring it onto your canvas. Resize to fit your ornament. My metal ornaments are 3.5″, so I made my image 3.6″ wide. I find that it’s nearly impossible to place a circle directly on a circle without ending up with a white edge, so I cheat the size just a bit to make sure it covers the entire face of the ornament.
If you’d like, you can add a name using the Text tool. Choose your font, resize, change the color, and place on your ornament, making sure to place the name low enough that it doesn’t get cut off by the hole in the ornament.
Once you’re happy, select both the name and the image and click Flatten to turn it into a single Print then Cut image. You’ll see that it says Print in the Layers Panel.
You’re ready to go! Click Make It in the upper right.
In the Prepare screen, you’ll see your image on a piece of white paper on a mat with a black box around it. Those black registration marks are used by your Cricut sensors to read exactly where to cut your image.
Important: click Mirror to reverse your image. You must do this or your image will be backward when you go to put it on your ornament. Click Continue to go to the Make Screen.
Before we finish making our ornament, we have to talk color!
Cricut Print then Cut Color Management
Unlike other more robust softwares like Photoshop, Cricut Design Space doesn’t have a way to manage the color within the program using an ICC profile. An ICC profile is basically a small computer file that makes sure your color is as accurate as possible when you print.
BUT, there is a way to use an ICC profile with Cricut Design Space—you just need to know where to look!
Important: I recently did a deep dive into using ICC profiles, which includes how to install ICC profiles on your Mac or PC. Start there—this post picks up after you’ve already installed the ICC profile onto your computer. You have to install your ICC profile first or you will not be able to manage the colors in Cricut Design Space.
Color Management vs. No Color Management in Design Space
Overall I have found an ICC profile to vastly improve the quality of my sublimation images printed through Cricut Design Space, as you can see here. This is the original image in Design Space from above.
Using the method below, I then printed the image using no color management, and then again using an ICC profile. What a huge difference!
The ornament on the left has no color management and is very green/blue compared the original. There’s a bluish-green cast over the entire image and it’s oversaturated, particularly in the trees. The cheeks of the bear are more orange vs. pink.
The image on the right is much closer. Overall it’s a bit more pink and the trees aren’t quite as yellow (see my color management caveats below), but overall it’s a much closer approximation to what’s on the screen.
You can see how it really does make a difference to have that ICC profile installed!
Color Management Caveats
Color management is dependent on so many things, including your specific printer, the types of sublimation ink in your printer, the sublimation paper you use, the software you’re using to create the images, and the blank you’re putting the image on, the humidity in your craft space, and whether or not Mercury is in retrograde (okay, maybe not that last one, but seriously, there are a LOT of variables).
As shown above, Cricut Design Space with an ICC profile works pretty well overall using my variables. It keeps my images from being oversaturated and overly green. Yet with an ICC profile in Design Space, I do tend to struggle a bit with items having a slight pink cast overall, and sometimes I struggle to get a true red (it often goes a bit pink). But it really does depend on any number of factors.
You may have a totally different experience with your own set of factors. This is where testing comes in handy. I have a huge sheet of polyester fabric for test prints so I don’t waste more expensive blanks—I highly recommend this practice.
Okay, let’s get back to Design Space! The following are the instructions for a Mac and a PC. Remember you have to install an ICC Profile before you can continue.
Printing Your File with a Color Profile on a Mac
In the Make Screen, Design Space will prompt you print your image. Click Send to Printer and this box will pop up. Keep Add Bleed selected, but also select Use System Dialog Box. Click Print.
That System Dialog box will most likely appear *behind* your Design Space window, so you’ll have to drag the Design Space program over a bit to see that window. Here, you’ll see a bunch of options. Select your sublimation printer. Toward the middle of this window, you’ll see a dropdown. Click it and choose Color Matching.
From here, choose ColorSync. If you remember from installing your ICC profile, ColorSync is the Mac utility for color management. If you see the name of your ICC profile there, check it. If not, click Other Profiles and choose your profile from the list.
Hooray! You now have color management.
Before you hit print, use that same dropdown to select Print Settings.
From here, you can choose your print quality (I usually choose Quality). Do NOT select Mirror Image here. You already did that in Design Space and it will mess you up if you do it here, trust me.
Make sure you have your sublimation paper in your printer and click Print!
Once you have your image printed, place it in the upper left corner of a Cricut cutting mat, insert into your machine, and your Cricut will read the registration marks and cut around your image.
Printing Your File with a Color Profile on a PC
In the Make Screen, Design Space will prompt you print your image. Click Send to Printer and this box will pop up. Keep Add Bleed selected, but also select Use System Dialog Box. Click Print.
That System Dialog box will most likely appear *behind* your Design Space window, so you’ll have to drag the Design Space program over a bit to see that window. Here, you’ll see a bunch of options. Select your sublimation printer. Toward the right of this box, you’ll see Preferences. Click it.
From here, choose More Options.
If you remember from installing your ICC profile, you will want to select “Custom” under Color Correction. From there, a window will pop up. To use your ICC Color Profile, you want to select “No Color Adjustment” and click “OK”.
Hooray! You now have color management.
Before you hit print, use that same pop up window to select Print Preferences. From here, you can choose your print quality (I usually choose “High”).
Make sure you have your sublimation paper in your printer and click Print!
Once you have your image printed, place it in the upper left corner of a Cricut cutting mat, insert into your machine, and your Cricut will read the registration marks and cut around your image.
Once your image is printed, you’ll transfer it to your blank using the manufacturer’s time and temperature settings. Again, I suggest doing a test print on a piece of polyester fabric to make sure everything looks good, then printing another to use on your actual blank!
Did you find this tutorial on using Cricut Design Space for sublimation helpful? Check out these other tutorials in my Sublimation for Beginners series!
Learn More About Sublimation
Sublimation Cheat Sheets for Time, Temperature, Pressure & More!
Must-Have Sublimation Supplies and Tools
How to Use Photoshop for Sublimation Crafts
Heat Press Machine Comparison for Sublimation Crafters
How to Use Cricut Design Space for Sublimation Crafts
Sublimation Printer Maintenance for Converted Printers
Sublimation ICC Profiles & Color Management for Beginners
Sublimation Paper Comparison: Which Sublimation Paper is Best?
The Beginner's Guide to Sublimation on Ceramic
Troubleshooting Sublimation Printing
What's the Difference Between Sublimation, Cricut Infusible Ink, and HTV?
Sublimation Blanks and More
Get an Epson EcoTank Printer

Leave a Comment