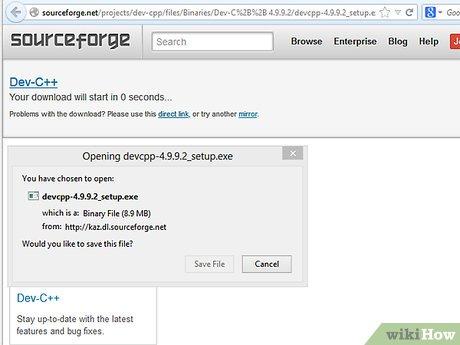
Get a compiler. A compiler transforms your raw source code (which you will soon write) into an executable application. For the purpose of this tutorial, get DEV-CPP IDE. You can download it here.WH.performance.mark('step1_rendered');
Get a compiler.
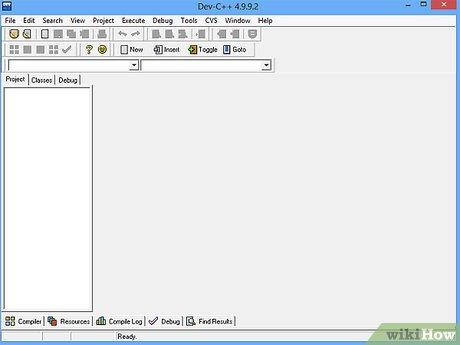
After installing DEV-CPP, open it. You will be presented with a window with a text area where you will write your source code.
After installing DEV-CPP, open it.
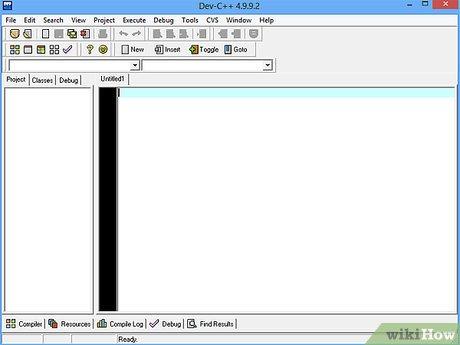
Get ready to write a program to display text in a textbox. Before you begin writing the source, keep in mind that Win32 applications don't behave in the same way as other languages, such as JAVA.
Get ready to write a program to display text in a textbox.
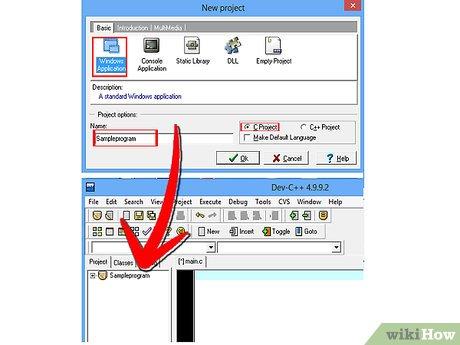
In the main screen of DEV-CPP, go to File -> New -> Project. You will be presented with another screen. Choose the little picture which says 'Windows Application' and set the language as 'C', not 'C++.' At the text box where it says 'Name', enter 'SimpleProgram.' Now, DEV-CPP will ask you where you wish to save it. Save the file in any directory, but just be sure to remember it. As soon as you are done with that, you will be presented with a template on the source screen. Do Ctrl+A and then Backspace. The reason we are doing this is so that we can begin anew.
In the main screen of DEV-CPP, go to File -> New -> Project.
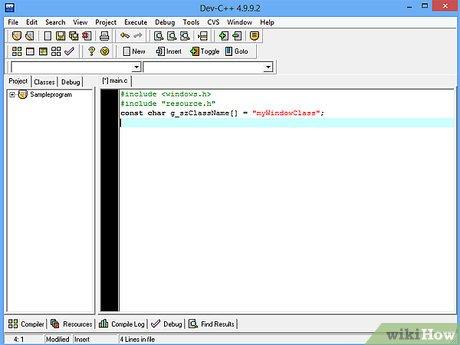
At the begin of your source, type '#include <windows.h>' (without the quotes). This includes the windows library so that you can make an application. Directly beneath that, write: #include 'resource.h' And then type: const char g_szClassName[] = 'myWindowClass';
At the begin of your source, type '#include <windows.h>' (without the quotes).
Write one method to handle all the messages and write another method where we will handle the messages from the resources. Don't worry if this is confusing. It will become clear later on. Now, save your source as SimpleProg.c. We will be leaving it as is for the moment.
Write one method to handle all the messages and write another method where we will handle the messages from the resources.
Make a Resource Script. A Resource Script is a piece of source code which defines all your controls (e.g: TextBox, Buttons, etc.) You will incorporate your Resource Script into your program and Voila! You will have a program. Writing the Resource Script isn't hard, but can be time consuming if you don't have a Visual Editor. This is because you will need to estimate the exact X and Y coordinates of the controls, etc. In your DEV-CPP main screen, go to File -> New -> Resource File. DEV-CPP will ask you 'Add resource file to current Project?' Click YES. At the top of your resource script, type #include 'resource.h', and also type #include <afxres.h> This takes care of all the controls.
Make a Resource Script.
Make your first control: a simple menu. Type:IDR_THEMENU MENUBEGINPOPUP '&File'BEGINMENUITEM 'E&xit', ID_FILE_EXITENDENDThe 'IDR_THEMENU' part defines your menu as THEMENU. You can call it whatever you want, however. The BEGIN part is self explanatory. The POPUP '&File' makes a new menu category called File. The & sign allows the user of your application to type Ctrl+F on the keyboard and quickly access your menu :) The MENUITEM 'E&xit', ID_FILE_EXIT adds a menuitem to the File category. You must, however, define the menuitem by doing ID_FILE_EXIT.
Make your first control:
Now for the button part. Your button will be inside a dialog, so we must make the dialog first. Do this by typing:WH.shared.addScrollLoadItem('0a6c39498d204a6566a6069422b23e41'){'smallUrl':'https://www.wikihow.com/images/thumb/3/33/46622-9.jpg/v4-460px-46622-9.jpg','bigUrl':'/images/thumb/3/33/46622-9.jpg/aid46622-v4-728px-46622-9.jpg','smallWidth':460,'smallHeight':345,'bigWidth':728,'bigHeight':546,'licensing':'<div class='mw-parser-output'><p>Image by: Uploader<br>
License: <a target='_blank' rel='nofollow noreferrer noopener' class='external text' href='https://creativecommons.org/licenses/by/3.0/'>Creative Commons</a>
</p></div>'}IDD_SIMPLECONTROL DIALOG 50, 50, 150, 142STYLE DS_MODALFRAME | WS_POPUP | WS_CAPTION | WS_SYSMENUMENU IDR_THEMENUCAPTION 'Simple Prog'FONT 8, 'MS Sans Serif'BEGINDEFPUSHBUTTON 'Hello!', ID_HELLO, 10, 10, 40, 15ENDThe IDD_SIMPLECONTROL defines your dialog. The four numbers after the word 'DIALOG' determine x-pos, y-pos, width, and height of the dialog. Don't worry too much about the Style part for now. The MENU IDR_THEMENU puts our old menu into the program. The CAPTION speaks for itself as does the font. The DEFPUSHBUTTON creates our button named 'Hello!' and we define it by saying ID_HELLO and give it x-pos and y-pos and width and height coordinates.That's it! We're done with our resource script. Only one more thing remains. We have to assign values to all the things we defined in our resource script (e.g. IDR_THEMENU, etc.) Save the resource file as SimpleProg.rc.
Now for the button part.
Go to File -> New -> Source File. Add the source file to the current project? Yes. You will be presented with a blank screen. To assign values to our defined controls, we give them numbers. It doesn't matter too much on which numbers you give your controls, but you should make them organized. For example, don't define a control by giving it a random number like 062491 or something. So type:#define IDR_THEMENU 100#define ID_FILE_EXIT 200#define IDD_SIMPLECONTROL 300#define ID_HELLO 400
Go to File -> New -> Source File.
Save this file as resource.h Do you remember we did '#include 'resource.h''? Well, this is why we did it. We needed to assign values.
Save this file as resource.h Do you remember we did '#include 'resource.h''?
Get back to the source, our SimpleProg.c or whatever you called it. Type:int WINAPI WinMain(HINSTANCE hInstance, HINSTANCE hPrevInstance, LPSTR lpCmdLine, int nCmdShow){return DialogBox(hInstance, MAKEINTRESOURCE(IDD_NUMBERS), NULL, SimpleProc);}
Get back to the source, our SimpleProg.c or whatever you called it.
Don't worry too much with all the technical stuff here. Just know that this parts returns the dialog to our message handling procedure called SimpleProc.
Don't worry too much with all the technical stuff here.
Type:BOOL CALLBACK SimpleProc(HWND hWndDlg, UINT Message, WPARAM wParam, LPARAM lParam){switch(Message){case WM_INITDIALOG:return TRUE;case WM_COMMAND:switch ( LOWORD (wParam) ) {case ID_HELLO:MessageBox(NULL,'Hey', 'Hallo!', MB_OK)break; case ID_FILE_EXIT:EndDialog(hWndDlg, 0);break;}break;case WM_CLOSE:EndDialog(hWndDlg, 0); break; default: return FALSE;}return TRUE;}This part handles the dialog messages. For example in the case ID_HELLO (our button), we make a message box saying hello. Also, in the case where we go to File and Exit, we close the window in case ID_FILE_EXIT.
Type:
Make sure that your SimpleProc comes before the int WINAPI WINMAIN part! This is important if you want your program to work.
Make sure that your SimpleProc comes before the int WINAPI WINMAIN part!
Press F9 to compile and run your program!
Press F9 to compile and run your program!

Leave a Comment