WH.shared.addScrollLoadItem('img_10b7e234b6')WH.performance.clearMarks('image1_rendered'); WH.performance.mark('image1_rendered');
Open MPLAB IDE v8.56WH.performance.mark('step1_rendered');
Open MPLAB IDE v8.56
WH.shared.addScrollLoadItem('img_5225745f9a')
From the 'Projects' tab, select the first option 'Project Wizard'
From the 'Projects' tab, select the first option 'Project Wizard'
WH.shared.addScrollLoadItem('img_cd654cf6c4')
Click on 'Next' in the welcome window that appears
Click on 'Next' in the welcome window that appears
WH.shared.addScrollLoadItem('img_12e76a66e4')
Select the desired PIC which you need to program or build your project on and click on 'Next'
Select the desired PIC which you need to program or build your project on and click on 'Next'
WH.shared.addScrollLoadItem('img_345a6dbd19')
Select the active tool suite you require; among the list of tool suites given (Usually the HI-TECH Universal tool suite is preferred,if installed)
Select the active tool suite you require; among the list of tool suites given (Usually the HI-TECH Universal tool suite is preferred,if installed)
WH.shared.addScrollLoadItem('img_74946af1ed')
Check if the ToolSuite contents listed contains a compiler suiting your programming needs('HI-TECH ANSI C Compiler' in the case of a HI-TECH Universal toolsuite) and click 'Next'
Check if the ToolSuite contents listed contains a compiler suiting your programming needs('HI-TECH ANSI C Compiler' in the case of a HI-TECH Universal toolsuite) and click 'Next'
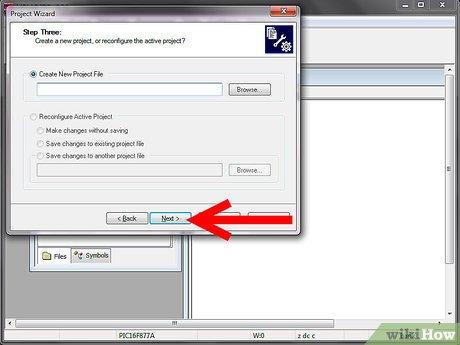
Create a new project file at your desired location in the desired name.
Create a new project file at your desired location in the desired name.
WH.shared.addScrollLoadItem('img_12fc9e53e3')
Take care that the project file is saved in the '*.mcp' format and click 'Next'
Take care that the project file is saved in the '*.mcp' format and click 'Next'
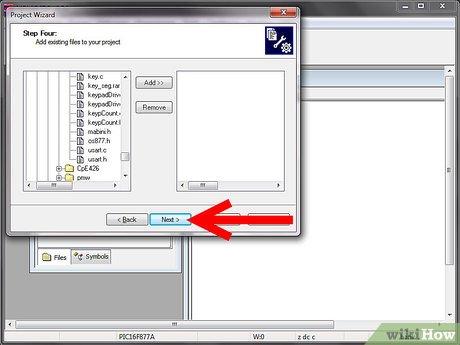
In the next window , add any files you desire to add to your new project,if required. else just skip this step by clicking 'Next'.
In the next window , add any files you desire to add to your new project,if required.
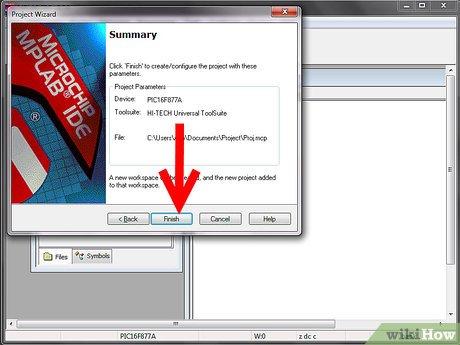
Now click 'finish' and your new project is created.
Now click 'finish' and your new project is created.

Now select the 'New' option from the 'File' tab.
Now select the 'New' option from the 'File' tab.
WH.shared.addScrollLoadItem('img_2415878fa0')
Select 'Save as' option from the 'File' tab and save the new file in the same folder in which you have created the project by selecting a suitable option from 'save as type'(depending on which type of program you're doing)Example: C Source Files if you're doing programming in CAssembly Source Files if you're doing programming in ASSEMBLY language etc...
Select 'Save as' option from the 'File' tab and save the new file in the same folder in which you have created the project by selecting a suitable option from 'save as type'(depending on which type of program you're doing)
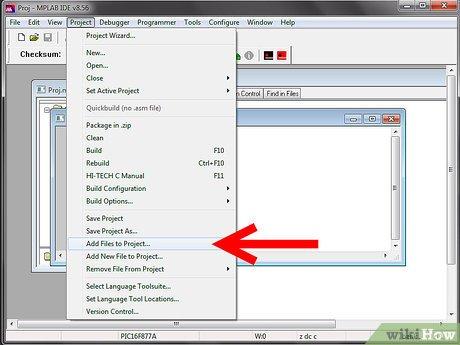
Go to the 'Project' tab and select the option 'Add Files To The Project' and add the file saved in the previous step.
Go to the 'Project' tab and select the option 'Add Files To The Project' and add the file saved in the previous step.
Begin programming in the file.
Begin programming in the file.

Leave a Comment